Monday, February 9, 2015


Monday, August 18, 2014
Working GNS3 1.0beta2.dev1 on Linux Mint 17 Qiana 64 bit

http://castroaa.blogspot.com/2014_04_01_archive.html
GNS3 1.0 installation on Ubuntu and other Ubuntu based Linux like Xubuntu, Lubuntu GNS3 installation.
I have tried it today on Linux Mint 17, Qiana 64 bit.
So far I'm not encountering any issues yet, the latest beta release of GNS3 also works fine with Linux Mint 17 64 bit.
Sunday, July 27, 2014
Section 2: IPv4 IGP Protocols (24 Points) of CCIE V5 Routing and Switching Configuration Lab
Section 2.1: OSPF No loopback networks should be advertised as host routes. (1 point)

Router1
Router1(config)#router ospf 1
Router1(config-router)#network 1.1.1.0 0.0.0.255 area 0
!--- configures interface serial
1/0 under OSPF area 0.
Router2
Router2(config)#router ospf 1
Router2(config-router)#network 1.1.1.0 0.0.0.255 area 0
!--- configures interface serial
1/0 under OSPF area 0.
Router1(config)#int loopback 0
Router1(config-if)#ip ospf 1 area 0
!--- configures interface loopback0 under OSPF process id 1 area 0.
Router2(config)#int loopback 0
Router2(config-if)#ip ospf 1 area 0
!--- configures interface loopback 0 under OSPF process id 1 area 0.
Commands output:
After adding the loopback interface results:
Router1#show ip route
Codes: L - local, C - connected, S - static, R - RIP, M -
mobile, B - BGP
D - EIGRP,
EX - EIGRP external, O - OSPF, IA - OSPF inter area
N1 - OSPF
NSSA external type 1, N2 - OSPF NSSA external type 2
E1 - OSPF
external type 1, E2 - OSPF external type 2
i - IS-IS,
su - IS-IS summary, L1 - IS-IS level-1, L2 - IS-IS level-2
ia - IS-IS
inter area, * - candidate default, U - per-user static route
o - ODR, P -
periodic downloaded static route, + - replicated route
Gateway of last resort is not set
1.0.0.0/8 is
variably subnetted, 2 subnets, 2 masks
C 1.1.1.0/24
is directly connected, Serial1/0
L 1.1.1.2/32
is directly connected, Serial1/0
2.0.0.0/32 is subnetted, 1
subnets
O 2.2.2.2
[110/65] via 1.1.1.1, 00:02:06, Serial1/0
3.0.0.0/32 is
subnetted, 1 subnets
C 3.3.3.3 is
directly connected, Loopback0
Router1#show
ip ospf interface loopback 0
Loopback0 is up, line protocol is up
Internet Address
3.3.3.3/32, Area 0
Process ID 1,
Router ID 3.3.3.3, Network Type
LOOPBACK, Cost: 1
Topology-MTID Cost Disabled
Shutdown Topology Name
0 1 no no Base
Enabled by
interface config, including secondary ip addresses
Loopback interface is treated as
a stub Host
----------- interface loopback 0 is advertised as a
hosts.
with the ip ospf network point-to-point command result
under loopback 0:
Router1#config t
Router1(config)#int loopback 0
Router1(config-if)#ip ospf network point-to-point
Router1#show
ip ospf interface loopback 0
Loopback0 is up, line protocol is up
Internet Address
3.3.3.3/32, Area 0
Process ID 1,
Router ID 3.3.3.3, Network Type
POINT_TO_POINT,
Cost: 1
Topology-MTID Cost
Disabled Shutdown Topology Name
0 1 no no Base
Enabled by
interface config, including secondary ip addresses
Transmit Delay is
1 sec, State POINT_TO_POINT
Timer intervals
configured, Hello 10, Dead 40, Wait 40, Retransmit 5
oob-resync
timeout 40
Supports
Link-local Signaling (LLS)
Cisco NSF helper
support enabled
IETF NSF helper
support enabled
Index 2/2, flood
queue length 0
Next
0x0(0)/0x0(0)
Last flood scan
length is 0, maximum is 0
Last flood scan
time is 0 msec, maximum is 0 msec
Neighbor Count is
0, Adjacent neighbor count is 0
Suppress hello
for 0 neighbor(s)
Friday, July 18, 2014
CCIE V5 Configuration Practice Labs 3rd Edition Topology
Here's how the ccie v5 configuration practice lab topology looks on my GNS3 Project. I'm using C7200 IOS image, 3 Quad NICs and 4X3560 physical switches.
 And here is the physical topology:

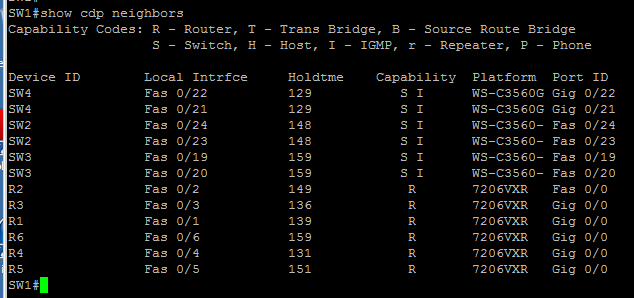

on the switches side:
Friday, June 20, 2014
Configuring Cisco 2509 as an Access Server
Requirements: 2500 Series router with ASYNC 1-8 port and Octal Cable
-Configure a loopback IP Address
-Configure each host mapping: example SW1 is connected to the first cable #1 of 8 using port 2001
-Configure line 1 - 8 ( no exec, transport input telnet)
---------------------------------------------------------------------------------
Access-2509#show run
Building configuration...
!
interface Loopback0
ip address 9.9.9.1 255.255.255.255
!
ip host SW1 2001 9.9.9.1
ip host SW2 2002 9.9.9.1
ip host SW4 2004 9.9.9.1
ip host SW3 2003 9.9.9.1
ip classless
!
line 1 8
no exec
transport input telnet
!
end
--------------------------------------------------------------------------------

Use the escape sequence Ctrl-Shift-6 then x to exit the current session.
-Configure a loopback IP Address
-Configure each host mapping: example SW1 is connected to the first cable #1 of 8 using port 2001
-Configure line 1 - 8 ( no exec, transport input telnet)
---------------------------------------------------------------------------------
Access-2509#show run
Building configuration...
!
interface Loopback0
ip address 9.9.9.1 255.255.255.255
!
ip host SW1 2001 9.9.9.1
ip host SW2 2002 9.9.9.1
ip host SW4 2004 9.9.9.1
ip host SW3 2003 9.9.9.1
ip classless
!
line 1 8
no exec
transport input telnet
!
end
--------------------------------------------------------------------------------
Use the escape sequence Ctrl-Shift-6 then x to exit the current session.
Monday, May 5, 2014
Installing loopback interfaces in Ubuntu
Note: Run all commands as root
apt-get install uml-utilities
modprobe tun
Running this command will install tap0, tap1 and so on..
tunctl
To configure the loopback ip address/mask:
for tap0:
ifconfig tap0 (ip-address) netmask (mask) up
to test run ifconfig

To remove the configured ip addresses:
ip addr flush tap0
To remove the loopback interfaces:
tunctl -d tap#
apt-get install uml-utilities
modprobe tun
Running this command will install tap0, tap1 and so on..
tunctl
To configure the loopback ip address/mask:
for tap0:
ifconfig tap0 (ip-address) netmask (mask) up
to test run ifconfig
To remove the configured ip addresses:
ip addr flush tap0
To remove the loopback interfaces:
tunctl -d tap#
Saturday, May 3, 2014
How to setup a PDF Printer in Xubuntu
From Ubuntu Software Center, search for preferred PDF printer application.
I have installed Master PDF Editor (free) Ubuntu.com user login required.
Install Cups PDF package:
apt-get install cups-pdf
Go to System-----> Administration ----> Printing.
A pdf printer should be available. Try to print any documents and check
the print out under /home/login-name/PDF/

Subscribe to:
Posts (Atom)